Deploy Lumu VA in Proxmox VE
Lumu Virtual Appliance (VA) is a virtualized machine that provides you with all the elements required to collect network metadata to provide you with maximum visibility when it comes to identifying compromised network endpoints within your infrastructure. This guide provides instructions on configuring Lumu VA in Proxmox VE.
Requirements
To ensure the Lumu VA works correctly, you must use supported virtualization platforms’ versions. The Lumu VA was tested with the following versions of Proxmox VE.
- 6.4-1
- 7.3-3
Virtual Appliance Setup
To set up your VA in your Proxmox VE environment, you need to create a VA and download the VMware image. Please refer to create and download a pre-configured image of Lumu Virtual . With the image downloaded, it’s time to set up and start your VA.
1. Copy the OVA file to your Proxmox deployment using your preferred file transfer utility. Keep in mind the selected folder for further steps.
2. Enter your Proxmox deployment using your preferred SSH client. Locate yourself in the selected folder, and unpack the OVA file using the following command:
- tar xvf lum_va_vmware.ova
After unpacking the OVA file, you will find three different files as follows:
3. Import the OVF file using the following command:
- qm importovf <VMID> lum_va_vmware-4.0.3.ovf <LOCAL_STORAGE> --format qcow2
Where:
<VMID> is the VM id. Use one available in your Proxmox deployment.
<LOCAL_STORAGE> is the local storage to be used.
Wait until the process finishes. Then, go to your Proxmox console and check the LumuVirtualAppliance information.
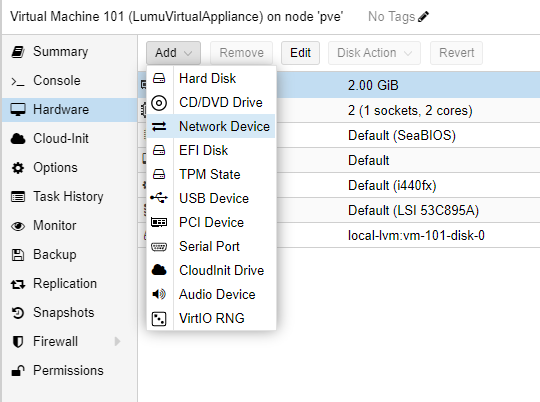
4. Add a network interface to your LumuVirtualAppliance . Go to the Hardware section, click the Add button, and select Network Device . Add the device according to your environmental conditions.
Initialize the Virtual Appliance
The initialization process consists of downloading the latest version of the Virtual Appliance software and performing pre-configuration tasks.

Start your virtual appliance using your Proxmox Web console. Select the newly created Virtual Machine and start it using the
Start
button.
To get access to your Virtual Appliance, use the Console button at the top right part of your screen.
Activate and Configure the Virtual Appliance
Once you have installed the Lumu Virtual Appliance, you are ready to activate and explore the VA general settings. See Lumu VA configuration guide for guidance.
Get an AI Summary
Related Articles
Deploy Lumu VA in VirtualBox
Lumu Virtual Appliance (VA) is a virtualized machine that provides you with all the elements required to collect network metadata to provide you with maximum visibility when it comes to identifying compromised network endpoints within your ...Deploy Virtual Appliances
To get started and review requirements for Lumu Virtual Appliances, consult our document Introduction to Virtual Appliances. Follow these simple steps to create and download a pre-configured Virtual Appliance and start illuminating threats and ...Deploy Lumu VA in VMware ESXi
Lumu Virtual Appliance (VA) is a virtualized machine that provides you with all the elements required to collect network metadata to provide you with maximum visibility when it comes to identifying compromised network endpoints within your ...Deploy Lumu VA in VMware Workstation
Lumu Virtual Appliance (VA) is a virtualized machine that provides you with all the elements required to collect network metadata to provide you with maximum visibility when it comes to identifying compromised network endpoints within your ...Deploy Lumu VA in Azure
Lumu Virtual Appliance (VA) is a virtualized machine that provides you with all the elements required to collect network metadata to provide you with maximum visibility when it comes to identifying compromised network endpoints within your ...